Ergometer Software Installation and Settings
Contents
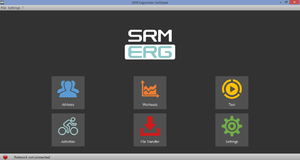
Installation and Landing Page of the SRM Ergometer Software
Please install the SRM ergometer software first on your controlling computer. Install or deinstall the software with the option Installer. It´s possible to choose one of the shown options directly. But before starting with the test procedure we recommend to check the settings first. Please start pedaling and check the connection indicator on the lower left corner of the screen: this indicator should be green, if not go to log tab and check the messages and the settings again.
Settings SRM Ergometer Software
Network
Choose a free and valid IP address (192.168.0.x) for your computer in the same sub network as the SRM Ethernet Torque Analysis Box (To install the Torque Analysis Box see the manual of the Torque Analysis).
If you are using MS Windows: Press “Start“ button, open “Control Panel“, open “Network and Internet”, select “Network and Sharing Center“, click “View Network Connections“, click on the connection you need to change (i.e. LAN), open “Properties“, double click on “Internet Protocol Version 4 (TCP/IPV4)“ and insert the chosen IP address.
Please insert a different IP address than that of the Torque Box. Just change the last or the last two numbers of the Torque Box IP (e.g. 192.168.0.89). Otherwise there will be a conflict of the IP addresses.
Default network settings are justified at the IP-adress of the Ergometer settings.
Network settings in windows
Please start the ergometer software again, start pedaling and check the connection indicator on the lower left corner of the screen: this indicator should be green. If not go to log tab and check the messages and the settings again.
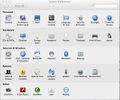
Network settings in OSX
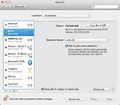
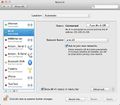
If you are using Apple OSX: Launch „System Preferences“ from the Apple menu (or Spotlight), click on the „Network“ icon in the lower right, click on the „Advanced“ button, in the pulldown menu next to „Configure Ipv4“ select „Manually“ and insert the chosen IP address.
Please start the ergometer software again, start pedaling and check the connection indicator on the lower left corner of the screen: this indicator should be green. If not go to log tab and check the messages and the settings again.
Chart
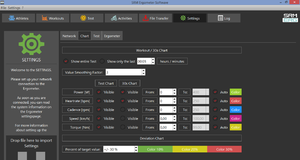
In this menu you can set the scaling of the graphs and the length of the displayed segments. By selection of Show entire Test you will be shown the entire test on the monitor. By clicking on “Show only the last…minutes”, you will only be shown the time period you entered before. In the lower part of the window please specify by clicking on Visible, if you want to see the values Power, Heart rate, Cadence and/or Speed. Under From / To, you can define the range, in which the values will be shown. Distance gives you the difference of the chosen range.
Value Smoothing Factor
- This number defines the smoothing factor of the graphs. All data are continuously smoothed. In a file length of example 2h represents a smoothing of 1% that each point shown represents the average of the last 12 seconds. You can set the smoothing factor in seconds or percentage.
Test Chart / 30s Chart
- The settings of Test Chart and 30s Chart are able to configure individually.
Deviation Chart
- Indicates the deviation of the cadence at the hyperbolic mode or the devation of the performance at the isokinetic mode. To use this skill it is necessary to drop data into the workout table.
- (For example: Power 100W / Cadence 50rpm / Choose Controll by Power)
Percent of target value
- With this you can change the range of the colored bars in the upper right area in the testing window. At the moment at 90 to 100 % completion of the cadence guideline, the bar stays green. At 80 to 90 % completion the bar turns yellow and at 70 to 80 % it turns red. There is no display of larger deviations.
Test
Start Test by
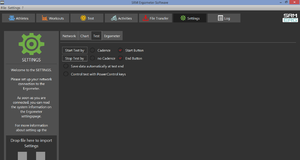
- Under the button Start Test by you can decide if the test (or training session) will be started by reaching a specific cadence or by clicking the Start Button.
- Starting by cadence: Start pedalling is displayed on the test interface.
Stop Test by
- Under Stop Test by you can decide if the test will end automatically when there is no more cadence to be measured or by manually clicking the End Button.
Save data automatically at test end
- You can set an automatically storage of your data file on your computer. Even when you click no, you will asked to save the data :file by ending the test.
Control test with PowerControl keys
- You have the possibility to start and stop the test (or the training session) with the keys of the PowerControl. Therefor the option have to activate.
- Keybord Shortcuts
- PRO (short): Test Start
- SET (short): Test Pause
- PRO (long): Test Resume
- SET (long): Test Stop
Ergometer
This menu gives you the opportunity to prepare the Ergometer for testing.
Slope
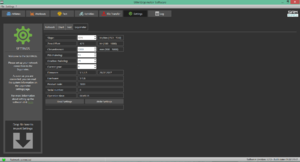
The slope in the ergometer software must be correspond to the slope of the PowerMeter and the PowerControl. We recommend to verify and control the slope of the PowerMeter before every test day. You can find the correct PowerMeter slope on small labels located at:
- The rear of the PowerMeter
- The front of the Ergometer
- The right crank arm
- The handlebar
Zero Offset
The PowerMeter delivers a certain frequency which is proportional to the torque of the pedal force on the crank. If there is no load on the crank, the PowerMeter is sending a bas frequency which must be communicated to the Ergometer software and to the PowerControl as a reference value. This procedure is called zero offset calibration (offset adjustment).
The zero offset calibration has to be done before every new assembly of the PowerMeter and also before every measurement resp. every training on the Ergometer. A wrong zero offset calibration can result in an internal miscalculation of the power.
Circumference
The circumference only influence the displayed speed and is not important for the calculation of the data. We recommend to insert a value of 1000 mm.
For a more detailed overview of the calibration see Calibration
PM/Gearbox chainring and Current gear
At first the user defines the gearing with which he wants to ride the isokinetic mode. The cadence is held very consistent in this mode but it is only correct when you have chosen the right settings. At the current ergometers the settings of the gearing are adjusted at 53/15 for all gears if you adjust both the gear on the Ergometer and in the software. The two images on the right display how it looks after adjusting the gearing.
If you change only the gearing of the Ergometer itself and not in the software you have to adjust the settings of the gearing for getting the right cadence. This is possible by increasing the Gearbox chainring and/or by lowering the PM chainring when choosing a lower gearing and vice versa.
Older ergometers can have a different gearing and with a change of the chainrings the gearing will change as well. The new fixed gear must be entered accordingly. If the fixed gear is not known or the cadence deviates from the specified isokinetic test profile, the gearing may be readjusted or corrected based on various experiments (trial & error). For this purpose, in each case only small changes to one or both values should be performed.
Firmware and Software Update
Please download the latest Ergometer Firmware and Software from our Website and follow the on-screen instructions to install.
http://www.srm.de/products/ergometer/
After installing the Ergometer software on your system, you can install the latest firmware on the Ergometer. Please follow the instructions below:
- 1. Open the SRM Ergometer Software and go to the File Transfer tab.
- 2. You can upload the firmware via drag and drop or select the firmware file directly from your system. The firmware is now loaded and installed.
- 3. After you have successfully installed the firmware open the settings and select the tab "Ergometer" and press "Read Settings" to read the internal information. The number of the new firmware version installed should be displayed and you have successfully updated your SRM Ergometer firmware.
Hardware, Product Code and Serial Number
These informations are implemented from the SRM company to identify the ergometers specifications. The current hardware version is displayed (e.g. V 0.8). The serial number represents the serial number of the SRM Ergometer.
Operation time
The operation time will be documented in hh:mm:ss.
Read and write settings
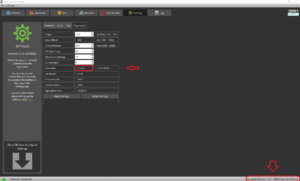
When everything is filled in correctly it is important at first to read the settings of the ergometer incl. the zero offset and the slope and then write the settings. With write settings it is possible to insert the slope and to save/write it for the correct calculation of the data. Please note that the inserted slope must correspond to the slope of the PowerMeter. If the Ergometer is not connected you will get an error with action failed as shown in the first screenshot. You will have to check the cabels and/or the network settings if everything is connected correctly. When everthing works fine the second screenshot will be shown.
Adjustment of the SRM Ergometer Brake Controller
A new brake controller has been installed with the firmware (V: 1.2.2.). To update the SRM Ergometer to the new brake controller, please follow the instructions below
- 1 Open the settings and select the tab "Ergometer".
- 2 Press "Read Settings" to read the internal information.
- 3 Press the key combination ALT + SHIFT + A to make the controller settings visible.
- 4 Press the "Get" button to read the current control parameters. Make a note of the saved values in order to revert back to the default settings if needed.
- 5. Change the 3 - Factor Control to PID- Control. To do so, press the 3 Factor tap and choose PID.
- 6. Adjust the parameters to the recommended values:
- P = 50
- I = 0
- D = 45 ± 5
- 7.The control parameters are transferred to the Ergometer controller with the "Set" button. Press “Get” again to make sure that the values have been saved.
- 8.Congratulations, you have successfully updated your SRM Ergometer Brake Controller
Taskbar
File
Close the SRM Ergometer software
Settings
Restore factory settings: Reset settings
?
About this software: Software version, build date, Qt version


